I received the battery tray today and it was more beautiful in person. Needless to say I installed it immediately! Here are the pictures I took as I was installing it.
Thursday, December 23, 2010
Monday, December 20, 2010
I love the off season....
I love the off-season. I really do. Probably more than I do the show season. This is the time of the year when I make all the little changes and improvements to Trinity that I've been thinking of throughout the year or, as in the duals and the shifter, that were on my "Wish List".


One improvement that was more of a necessity than a "want" was the Optima battery. With my short commute time and high drain electronics I've managed to kill another battery so it was time to upgrade to something better suited to my needs. Problem with that is that the Optima battery best for the job is Yellow... and the car isn't. So I bought a tray to cover it up and it was beautiful but it didn't work for my application so I had to return it. I kept looking though.
Patience always pays off especially in customization. OptimaTrays.com is wonderful to work with and together we designed a tray that is unique to my car and will cover that Yellow Top wonderfully. It will also work well with the brushed aluminum caps I have under the hood with a nod to the flames on the plenum cover and the grille pony. I received an email today that it is finished and I should have it in hand by Christmas Eve. I'm very excited! Benjamin Barch of Barch Designs (http://www.optimatrays.com/) created the tray and was kind enough to send me a couple pictures.
Merry Christmas everyone!
I'll be sure to post more once I have it installed.


Monday, December 06, 2010
A big shout out to Gear Heads for the great install on Friday!!

Thanks again!
Reba
Wednesday, October 13, 2010
Shelby Kicker Upgrade for Ford Mustang Shaker 500
This one has explicit language... but it's a good song to show off the Shelby Kicker Upgrade package for the Mustang Shaker systems.
Monday, October 11, 2010
Good weekend...
Friday night I hung out at the Nostalgia Nights show (I-20 and Little Road, Arlington). I didn't go out there with anyone but Tara came out and Donnie and Sonya dropped by. I'm learning that, outside of my home life, I'm pretty much satisfied with being alone.
I enjoyed Tara's company and the fact that Donnie and Sonya dropped by but I would have enjoyed my time alone. Saturday I did more of the same. Knights of Columbus charity Car Show at St. Joseph Catholic Church. Saw a friendly face there and made a couple new friends. Nice to see different cars for a change of pace. Then the NTMC Cruise at the Cracker Barrel at 4 that afternoon. All my club friends, good laughs, a class award then dinner with the gang before heading home. Only one more cruise left in the season and then the holidays will be here. Soon it will be time to begin work on the off-season mods and changes for next season. I'm actually excited about that. :)
I enjoyed Tara's company and the fact that Donnie and Sonya dropped by but I would have enjoyed my time alone. Saturday I did more of the same. Knights of Columbus charity Car Show at St. Joseph Catholic Church. Saw a friendly face there and made a couple new friends. Nice to see different cars for a change of pace. Then the NTMC Cruise at the Cracker Barrel at 4 that afternoon. All my club friends, good laughs, a class award then dinner with the gang before heading home. Only one more cruise left in the season and then the holidays will be here. Soon it will be time to begin work on the off-season mods and changes for next season. I'm actually excited about that. :)
Wednesday, July 21, 2010
New website design!
Hope you like the new site design. I've enjoyed sprucing up the place.
I'm still working on the brakes but I got sidelined with Susan's Mustang this week. We haven't driven it since her operation on 6/28/10 and consequently the battery gave out on us. 100+ temperatures will do that to a nearly 4 year old battery anyway then add in the fact it wasn't getting recharged daily... Well, yeah, it was D.E.A.D. We couldn't even unlock the doors or move it into neutral. Nothing.
I borrowed Donnie's charger and we left it on the car overnight. This morning it showed that we had a full charge. Pulled the charger off and she started up without any problems at all. I will test it again tonight and it it shows any signs of degradation I'll put it back on the charger (on trickle per Donnie) and start looking for a decent replacement. I'm praying that won't happen because with Susan out for medical and on no-pay status we really didn't budget for a new battery. :)
Oh well, we will do what we have to do and smile, thankful for what we have and the blessings we have been given.
Until later!
Reba
Wednesday, July 14, 2010
Contact from Hawk!
Hawk Performance has contacted me and it was a very wonderful conversation. I will follow the instructions provided and follow up as requested. I do still want to hear from others with these pads though.
- Reba
- Reba
Hawk Performance Ceramic brake pads
Anyone out there have Hawk Performance Ceramic brake pads? The ones that come in the yellow and black box? If so, how are they working out for you? I have some concerns that I have voiced to Hawk and I'm awaiting a reply. I just wanted some unbiased feedback from other consumers. Let me hear your stories. I can't go into details of mine just yet as 1) I don't want to influence what you tell me and 2) I want to give Hawk the opportunity to reply to me. That seems to me to be the correct and fair way to conduct business with any vendor. Right?
I have some new photos to add... I'll try to post those soon!
- Reba
I have some new photos to add... I'll try to post those soon!
- Reba
Tuesday, June 22, 2010
Trinity got new shoes!
-784404.JPG)
-786775.JPG)
-790516.JPG)
-792581.JPG)
-794683.JPG)
-796946.JPG)
I purchased the car on 6/19/2006 and four years to the day I replaced the original tires. (Hard to believe its been 4 Years!) I had taken the car to NTB to have them rotated and balanced but they wouldn't touch them. They stated they (NTB) had a policy that kept them from rotating tires with the wear bars showing. Well... crap.
I knew I needed tires but I was stalling as long as I could. The car had just over 25500 miles when I arrived at Discount Tire on 6/19/2010 and purchased a set of the Riken Raptors. Donnie's wife Sonya has these on her Mustang and they looked really nice plus the price was reasonable. About an hour later my car was ready with new tires which they took the time to "show mount" on my request. They look SWEET! And the ride is awesome. Of course, I still have to break them in a bit. :)
Also, Susan found this steering wheel cover and ends up it goes pretty well with the interior. :) I like it!
Here are the pictures!
Friday, June 04, 2010
Side Scoops by DG Custom Auto
Back on May 15th I took the car over to Jeff Holland at Autograph Sign Shoppe and we pulled the side stripes off the car and made some significant appearance changes. Once that was completed I spent a day or so trying to determine what the sides "needed" and kept coming back to side scoops. So... on May 17th I purchased some from DG Custom Auto, Inc.. They arrived on Monday, May 24th, just after 'the paint incident', and just in time to be put on before I put the wax back on.
When I first ordered these I had indicated my color code, G9, and that I needed them in time for an event in early June. Craig at DG Custom Auto, Inc. replied letting me know that they did not have any of the scoops in my color in stock but they were at paint and were expected in by the following week. I know that I can be persistent and, to some vendors, a bit of a pain in the rear but my frequent checking in for status didn't seem to upset Craig. If anything, he put a rush on getting them here... The scoops shipped on Friday, 5/21/10, and they were here by Monday, 5/24/10.
Installation is very straightforward and instructions are provided. I was surprised to see the 3M promoter supplied. Very pleasantly surprised! I didn't get that with some of the other pieces I have on the car and really wish those manufacturers had the forethought to provide it. I digress...
We aligned the scoops to the car - both sides - to ensure we knew where they would go. We then broke the seal on the 3M Promoter and quickly applied a light coat where the 3M tape would be applied. We waited 5 minutes then began the process of applying the scoops.
We pulled a little of each 3M tape back to form a "pull tab" and then carefully seated the top corner by the door making sure that the bottom corner (by the door) stayed aligned. We then pressed the scoop to the car gently while pulling the red 3M tape backing from under the scoop. Once all of the backing was removed we pressed firmly on all edges of the scoop, checked to make sure we had a good seal then stepped back to check our work. Looked AWESOME! Then we repeated the process on the other side. The pictures below are of the scoops when I first opened the box, after the first was installed, and then the next morning in full light.
I think they complement the car very well. :)
Thank you again DG Custom Auto, Inc.!!
- Reba
.JPG)
.JPG)
.JPG)
.JPG)
.JPG)
.JPG)
Monday, May 31, 2010
Paint...
Happy Memorial Day!
Time to catch up. Last post was on Thursday, May 20th. On Friday, May 21st, Susan and I met some of my high school friends for happy hour at a pub on the north side of town. We had some laughs, some drinks, took some pictures and then headed out. When we got to the car the whole back end was covered in bird droppings. This should have been a sign for how the rest of the weekend would be... but I digress...
We arrived home and despite the late hour I proceeded to wash the Mustang. I also washed Susan's. Heck, it was sitting right there and getting wet too so I figured why not surprise her with a clean car? (She loved it by the way). So, a couple beers later, jeans and t-shirt soaked through and through, I finished both cars and headed to bed.
A few hours later I was up and getting ready for my niece's wedding. Showered, dressed and with all my gear in hand (camera? check) I headed out the door to Meadowbrook Park, the site of the reception, to help with set up and to get some pictures before the wedding. (Yes, I am getting to the point.)
When I got there I noticed, and then mentally dismissed, the painters working on some park structures in the parking lot. I parked and went to help out. When I returned to my car a hour later all was well. We went to and then returned from the wedding. I parked a little closer this time to the painters... opting for a location that was not under a tree. From the painters there were two handicap spaces, an empty space, then me. Again my brain did not grasp the plastic sheeting, smell of paint and anxious look on the painters' faces. When I returned to my car several hours later they were watching me and I quickly noticed the paint all over my car. And I mean all over it. Glass. Trim. All Panels. The painters came over and were looking at it with me. I could see fingerprints on the car so it appeared they had already been there. Anyway, the dots would move so we figured they would come off. This was on Saturday, at 2:00 PM.
At 2:30, when I got it to my Mom's and we looked at it closer, it looked like dust and felt like a combination of tree sap and sandpaper... and it wasn't coming off... this is where the panic set in. It is also the beginning of a saga and process that did not end until I was back home and wiping it down in my driveway at 2:10 AM on Monday morning.
I won't bore you with the blow by blow details. This post is long enough as it is. However, I can say now that I have learned that clay bar and Windex will get overspray off a car. The car was also buffed and polished. (Thank you Tara and David Gowin!) When we were done it felt like glass. In the morning light it positively glowed. Luckily I had Monday off so the early morning hours didn't hurt as much but Susan did have an appointment that morning that I took her to. I also received my scoops on Monday afternoon (details to follow in a separate post) which were applied before I put down the first coat of Meguiar's Tech 2 wax that evening. Tuesday evening I followed up with the second coat. I still need to put a couple more on there to protect the paint but I feel better about it being protected from the elements.
There is still overspray on the trim (like the black areas around the side mirrors, window trim, etc) and around the newly installed decals on the windows. I am still working on how to get that off. The window decals may have to be removed, the paint scraped off with a razor blade (which is how it was removed from all the other glass) and then re-applied. That's a lot to re-do though.
So, anyway, it was nearly a disaster... there's still plenty to fix before Yellow Rose... but it wasn't a total loss.
Edit 6/1/10: Photos are below.
.JPG)
.JPG)
.JPG)
.JPG)
.JPG)
.JPG)
.JPG)
.JPG)
Thursday, May 20, 2010
Added a little extra touch to the engine...
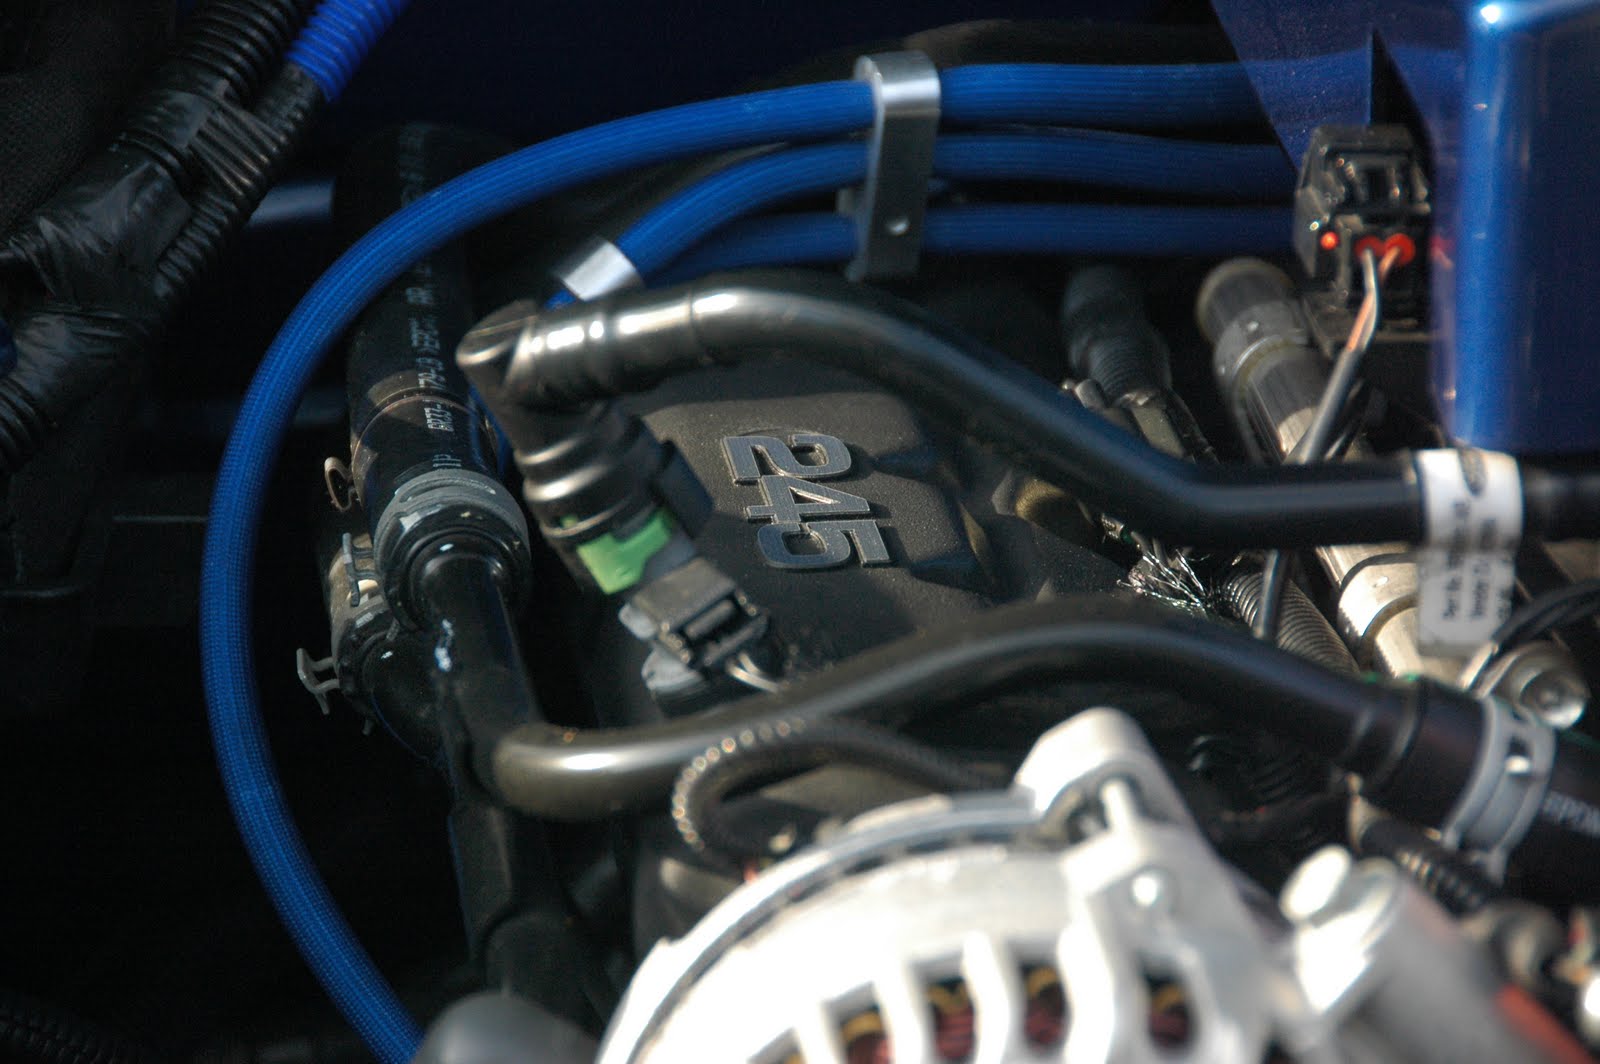
The 2006 V6 Mustang has a SOHC 4.0L engine capable of 210 HP from the factory. Today, most engine sizes are given in liters instead of cubic inches however we all want to know what that magical number is. You see, cubic inches translates to the size of the engine and that, to us gear heads, means power and speed. Think Boss 351, Boss 302, Boss 429 or the Roush 427. Those numbers are referring to the cubic inch of the engines. The larger the number the larger the engine.
"In the world of drag racing - "there ain't no substitute for cubic inches" - meaning, that the bigger an engine, the more power you can make."
To get technical about it,
"the cubic inch of a motor is usually a reference to the size of the motor. Technically, it is the sum of the volumetric displacement of the pistons as the engine makes one complete rotation."
So, yeah, we all want to know our magical number.... the CI or Cubic Inch.
The V6 Mustang that I have has the 4.0L engine which translates to 245ci. Its not a Boss 302 of course, but its not bad. What is all this leading to? I added something to the engine bay yesterday and, without an explanation to those who are not gear heads, you would walk away confused. :)
Here are the 2006 Mustang specifications - V6 and V8:
sohc V61
|
sohc V82
| |
Size, liters/cu. in.
|
4.0/245
|
4.6/281
|
Horsepower @ rpm.
|
210 @ 5250
|
300 @ 5750
|
Torque (lb-ft) @ rpm.
|
240 @ 3500
|
320 @ 4500
|
Availability
|
Standard
|
Standard
|
EPA City / highway mpg
| ||
5-speed manual
|
19/28
|
17/25
|
5-speed automatic
|
19/25
|
17/23
|
1. Base models. 2. GT models.
| ||
Engine Key: l/cu in. = liters/cubic inches; ohv = overhead valve; ohc = overhead camshaft; dohc = dual overhead camshaft; I = inline cylinders; H = horizonally opposed cylinders; V = cylinders in a V configuration; W = cylinders in a W configuration; rpm = revolutions per minute; CVT = continuously variable (automatic) transmission; NA = not available; "--" = measurement does not exist.
| ||
This is what I added:

These are badges made by Autobadges.com. I have one on each side of the engine on the valve covers. I'm a little worried that they may not stand up to the engine heat but they seemed to do okay this morning. We'll see how they are after I drive to Irving or Lewisville. :)
Here are some pictures taken after I put them on. Let me know what you think! - Reba

Monday, May 17, 2010
Side Scoops!!
Yeah! Bought these today! Susan is so good to me!
05 06 07 08 09 FORD MUSTANG PAINTED GT CS SIDE SCOOPS

I can't wait!!
- Reba
Saturday, May 15, 2010
Some early pics of Jeff's work - New Face Lift for the Stampede

No more rocker panel stripes.... :)

New windshield banner - Different style than previous one...

Rear Window Design... Multiple types of material were used. From the inside I can actually see through the pony tri-bar emblem.

The windshield banner after he finished it... That's Jeff working on the rear window....

Removed the Stampede 351 badges from the front and rear of the car and replaced with these "351" decals.
 Combo shot of front bumper number, windshield banner and un-striped sides.
Combo shot of rear window and rear number...
 So, what do you think?MORE PICTURES SOON! Have to wash and detail first!- Reba
 Friday, May 14, 2010
Working on Trinity
I'm over at Autograph Sign Shoppe working with Jeff Holland on some of
the ideas and pictures I've sent over. As always the real magic
doesn't begin until you are here with Jeff and his creative juices
start flowing. Already some of my great ideas, and I say that with a
tinge of sarcasm, have become awesome. Of course, knowing Jeff
anything can happen between the time he works with the art on the
computer to when he applies the graphic to the car. Awesome can easily
become brilliant!
Stay tuned.
I want THIS!!!

I've seen it in person and it looks BADD ASS. I've been researching it and watching the vids on YouTube... and I know that when I keep coming back to something that it means it is on my Hot List... So, I think this is the next big mod to the Mustang. If not, I may wear out my stock shifter!! (Thanks to Sarah for getting me into more "race style" driving!).
-------------------
DESCRIPTION:
New TCI® automatic transmission shifter fits in stock console and hooks up to the OE 5R55S transmission without modification.
The ‘05–’09 Ford Mustang GT is the hottest late model performance vehicle on the market, however the stock shifter has some drawbacks when it comes to serious street/strip performance. The new TCI® StreetFighter® ’05-’09 Ford Mustang Ratchet Shifter provides a positive stop shifting action that allows you to manually “speed shift” the transmission without fear of hanging between gears or missing a gear all together. Best of all, this new shifter also has an equally impressive billet, race-inspired appearance that makes it at home on the track or cruising in town.
The TCI® StreetFighter® Ratchet Shifter is a perfect fit in the ’05-‘09 Ford Mustang console and requires no modifications to your interior or the factory Ford 5R55S transmission. This shifter also utilizes the factory shift cable to further simplify the installation and comes complete with a lighted gear indicator for perfect gear selection.
http://www.compperformancegroupstores.com/store/merchant.mvc?Store_Code=TC&Screen=PROD&Product_Code=619570
Thursday, May 13, 2010
New lock pockets from Silverhorse Racing.
These are the triple chromed lock Pockets from Silver Horse Racing. I went ahead and got these even though the 'redesigned' version isn't out yet. I'm hoping that they work well enough that I will not need to return them and get the newer design...
I took the Mustang up to Audio Tint Depot where we removed the existing Ford Plastic lock pockets and found the quick disconnects that Tyler built into the LED lights. We were then able to remove the RadLites from the plastic pockets and thread them into the chrome ones. With that done we reinstalled them and seated them into the doors. These, as Silver Horse Racing stated, do not fit 100% true to OEM so I used a bit of the plastic trim adhesive to see if I could stabilize them. Since there are no moving parts (door pins) in this install there's no fear of the repetitive movement knocking them free.
I took the Mustang up to Audio Tint Depot where we removed the existing Ford Plastic lock pockets and found the quick disconnects that Tyler built into the LED lights. We were then able to remove the RadLites from the plastic pockets and thread them into the chrome ones. With that done we reinstalled them and seated them into the doors. These, as Silver Horse Racing stated, do not fit 100% true to OEM so I used a bit of the plastic trim adhesive to see if I could stabilize them. Since there are no moving parts (door pins) in this install there's no fear of the repetitive movement knocking them free.


The completed project turned out just as wonderfully as I hoped. The RadLites LED's look like they were made for these lock pockets. They sit totally flush and blend beautifully with the pockets. When they are off you barely notice them. At night the chrome amplifies the LED light even though these are bright enough on their own really.
I'll post some pictures soon of the entire door with these installed. Looks sharp.
- Reba
Monday, May 10, 2010
Mother's Day

The kids got together and cashed in some of their empty dog and cat food cans to buy me a Mother's Day gift. I think Momma Susan helped though because she had to go pick it up....
I now have my very own, and very blue, 2 Ton Jack, jackstands, chocks, and creeper. I know... It was just what I'd been wanting and will come in handy this summer as I get ready for Yellow Rose.
I was VERY EXCITED about being able to take the wheels off of the car to clean them (no more busted up hands) and with them off I can clean the wheel wells too. Again, hard to do with the wheels in place. I haven't had the chance to use them yet but I can't wait!
Thank you Momma Susan, Nicholas, Snoopy, Lil'Bit, Lilo, Haley Alexis, Casey, and Austin. Oh, and I understand that Clyde, Jada, Jazz and Jerry helped too!
I love you!
Reba
Thursday, May 06, 2010
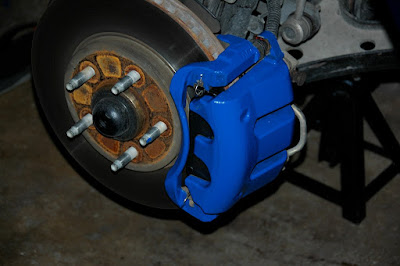
New Hawk Brakes! Painted Calipers!
Hawk brake pads arrived today about 30 minutes after I had dropped the car off at NTB so I walked them down there and had the pleasure of getting to watch as he was machining my rear driver's side rotor. He did say that the rear rotors were also warped... worse than the fronts... o.O
A couple of hours later I picked up the car and on the way back down to my office I ran it around the block making some hard stops from 35-45 MPH and some softer ones (not complete stops) and I can really tell the difference. I'm really pleased with the brakes and with NTB! Good job!
I was talking with Sarah via texting and she said if I brought the car by that she'd paint the calipers... WOOHOO! So, off I went to Sarah and Troy's!!!
They turned out beautifully... Here are the pics of before, during, and after.
Thank you so much Sarah and Troy!! - Reba
--------------------------------------


Monday, May 03, 2010
Well... I had some plans....
I was looking at fixing some paint/small body dents and also MAYBE upgrading the rims but Trinity has decided that other things are requiring attention first.
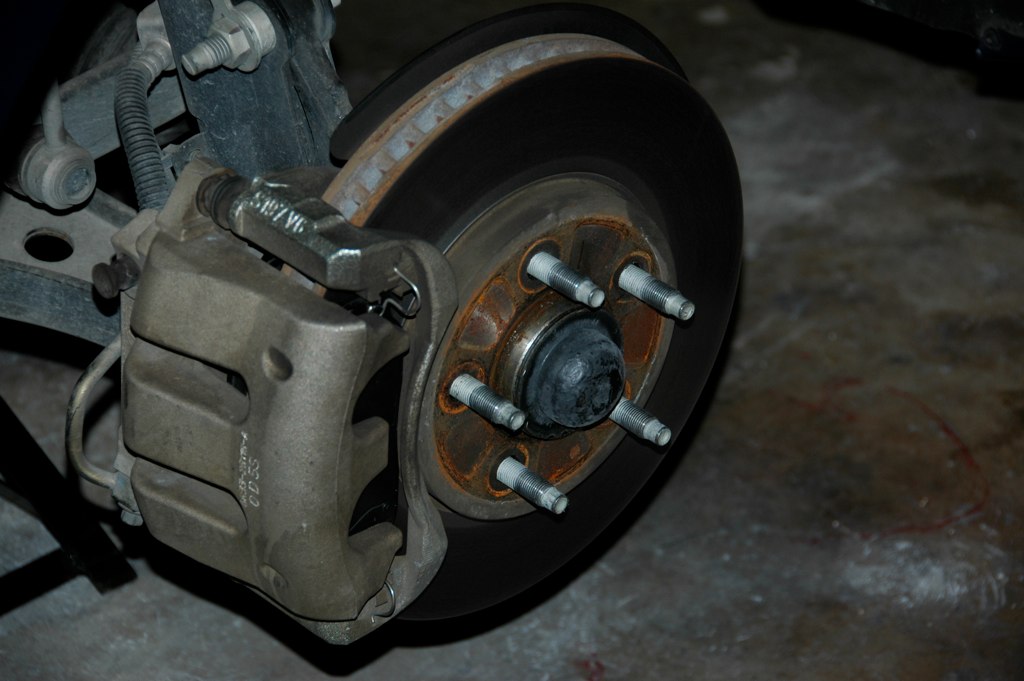
I had noticed that on extreme braking (from higher speeds on the highway and track) that the response was diminished and the brakes seemed to almost "grind" a bit. I thought maybe the ABS was kicking in a little too hard at first but my instinct, and experience, with my Mustangs told me not to guess.
Since we had a rain-out on AER Manufacturing's show last Saturday (rescheduled for 5/8/10) I took that opportunity to take her up to Bankston Arlington (prev. Texan) for a complimentary brake inspection. Ends up the front pads are shot, the front rotors are warped and the rear pads are down to 4mm. So... no paint and no rims right now. Baby needs some brakes.
I just bought some ceramic brake pads on American Muscle:
- Hawk Performance Ceramic Brake Pads (2005+ Mustang GT/V6 Front Pair) $94.99
- Hawk Performance Ceramic Brake Pads (2005+ Mustang GT/V6 Rear Pair) $79.99
They should be here by Wednesday. I talked with NTB down the street from work and got a quote on installing the pads and turning the rotors - $214.83 - for all four wheels. Total for the whole thing - pads, install, turning the front and rear rotors - $411.92. The dealership wanted $230 just to do the front (pads included) and another $230 for the rear. I'm saving a little bit AND I'm getting upgraded pads. I could save more by having O'Reilly's turn the rotors at $15 each but I have to take them off the car and bring them in to them... not possible when it is your ONLY car. :)
It needs to be done so we'll bite the bullet and get it taken care of before it becomes a larger, more dangerous and more expensive problem. I think I'll check with Sarah about painting the calipers too. :)
- Reba
Monday, April 26, 2010
Visited with Daniel and Liz Chavez this afternoon. They own a shop in Arlington that does Fabrication, Paint and such (I don't have the card with me at the moment sorry). Tyler recommended them and I needed some idea of what it would cost to fix that bad dent in the rear wheel well, some scratches, and possibly clear coat the car (future project). It also allowed me to determine if I liked them, how they work, their attention to detail, commitment to quality and overall disposition. I left there tonight pleased that I had made that trip. I may not be able to afford to do everything that I want - yes, need even - to do but I know that I have found the shop can help me bring the ideas I have in my heart into wonderful mirror image reality. Stay tuned!
Wednesday, April 21, 2010
Wow, it has been CRAZY!
As you know Palestine was cancelled so instead we hung out at Nostalgia Nights in Arlington before the weather came in and brought us, strangely enough, snow. Flash forward to March 26th - Again we headed out to Nostalgia Nights but this time we got there early and it was packed! The weather was perfect and everyone had a good time. Saturday, March 27th, we headed over to North Richland Hills to the Christian Classic Cruiser's show. I'd never been to theirs before. It's a judged show and it really showed me how out of this I was! It was a good night with friends nonetheless topped off with 80's night (LOL) at a bar "around the corner" in Wataga, Texas.
April took off like a rocket with three shows on April 3rd. - Cars and Coffee - Dallas, Freddy's in Frisco, and Monthly Muscle in Plano. The Cars and Coffee had probably over 1000 cars there! There was a Bugatti, some Lamborghinis, Ferraris, Alfa Romeo, Lotus, Tesla... You name the car and it was there. Everyone had coffee, walked around and looked at cars, talked to owners and then went home. It was really cool.
I won my first award of 2010 at Freddy's. :) Lastly the Monthly Muscle show was fun but I was TIRED. :) That's a lot of car shows for one day when you've been out of the circuit for a year. :)
April 10 - North Texas Mustang Club's first Cracker Barrel Cruise of the season and all of Tara, Justin and Vinny's hard work passing out flyers at all these shows paid off. It was PACKED and I picked up my second award of the year.
I still have some minor things I wanted to get done before Yellow Rose which, by the way, I will be in this year provided of course there is room. I understand it is filling up quickly.
I'll keep you updated!
Saturday, March 20, 2010
Palestine cancelled... Yet...
Thanks to the wonderful change in weather the North Texas Mustang Club leaders decided to cancel the road trip to Palestine. I was SO DISAPPOINTED having worked for months to prepare the car for its grand debut back into showing. :) So, not willing to go down without a fight, I suggested to Susan that after dinner we head out to the Friday night show on Little Road. Didn't know at the time that our friend and fellow NTMC Members Tara and Justin were going out there to hand out flyers anyway.
Well, our dinner for two at Pluckers became three and Tara invited Justin who invited Troy & Sarah as well as Annie & Vinny. Party time! After dinner we headed over to the show. It was a light crowd but I think it satisfied that "need to show" feeling for a little while. It also let me see that the time and money spent back in December for the LED's was well invested. We had a steady flow of folks over to check out the Stampede and the light show. I had the underbody lights and engine lights on sound and the interior and trunk on steady. Bass notes would kick the underbody on hard and the treble and mid tones had seven colors beating from under the hood. I had anticipated the lights drawing the younger crowd and the little kids but was surprised to see the adults that came over too. I was so stoked when we headed out for the night. :)
All in all, a good evening! I'm looking forward to the next one!
Friday, March 19, 2010
Recent Changes
Here are some pictures of the recent changes. I've removed the door lock pins and replaced them with flush mount billet LED's (blue of course) from RadLites LED Lighting that are tied to the factory alarm system. When the key is removed and the factory system displays the Armed status in the cluster the lights in the doors also flash. The key, when inserted and moved to the on position, disables the factory alarm and thus the lights. These guys are BRIGHT at night.
These pictures also show the Kicker Subwoofer in the trunk and the kicker subs in the doors both of which now have the blue piping to set them off.
I've also added the blue piping to the top of the dash and returned it to the sides of the center stack (may not keep it there though). You can also see the new AC knobs, the shifter surround, the shifter handle covers, and etc.
Its all coming together! Scary part is I have a whole laundry list of things I still want to do. Of course very little of it has to do with the interior. :)
- Reba
-723271.JPG)
-734982.JPG)
-733148.JPG)
-724685.JPG)
-729547.JPG)
-727184.JPG)
-731419.JPG)
-721834.JPG)
Subscribe to:
Posts (Atom)